

【Demo】深度照片风格转换

文件列表(压缩包大小 182.32M)
免费
概述
深度照片风格转换
论文《Deep Photo Style Transfer》的代码和数据
设置
此代码基于torch,它已经在Ubuntu 14.04 LTS上进行了测试。
依赖:
CUDA后端:
下载VGG-19:
sh models/download_models.sh
编译cuda_utils.cu(在makefile中调整PREFIX和NVCC_PREFIX):
make clean && make
用法
快速开始
要使用提供的脚本生成所有结果(在examples/),只需运行:
run('gen_laplacian/gen_laplacian.m')
在Matlab或Octave中输入以下命令:
python gen_all.py
最终输出结果在examples / final_results /中。
基本用法
给定带有语义分割蒙版的输入图像和样式图像,将它们分别放在
examples /中。 它们将具有以下文件名形式:examples / input / in <id> .png,examples / style / tar <id> .png和examples / segmentation / in <id> .png,examples / segmentation / tar <id>.png;在Matlab中使用
gen_laplacian / gen_laplacian.m计算抠图拉普拉斯矩阵,输出矩阵将具有以下文件名形式:gen_laplacian / Input_Laplacian_3x3_1e-7_CSR <id> .mat;
注意:请确保内容图像分辨率与Matlab中的Matting Laplacian计算和Torch中的样式转换一致,否则结果将不正确。
运行以下脚本以生成分段的中间结果:
th neuralstyle_seg.lua -content_image <input> -style_image <style> -content_seg <inputMask> -style_seg <styleMask> -index <id> -serial <intermediate_folder>运行以下脚本以生成最终结果:
th deepmatting_seg.lua -content_image <input> -style_image <style> -content_seg <inputMask> -style_seg <styleMask> -index <id> -init_image <intermediate_folder/out<id>_t_1000.png> -serial <final_folder> -f_radius 15 -f_edge 0.01
你可以将-backend cudnn和-cudnn_autotune传递给两个Lua脚本(步骤3.和4.),从而潜在地提高速度和内存使用率。libcudnn.so必须位于LD_LIBRARY_PATH中,这需要cudnn.torch。
图像分割
注意:在论文中,使用从DilatedNet修改而来的自动场景分割算法生成所有比较结果。手动分段可实现更多不同的任务,因此我们在examples/segmentation/中提供了掩膜(mask)。
我们所使用的掩膜颜色(你可以在两个* .lua文件的ExtractMask函数中添加更多颜色):
| 颜色 | RGB值 | 十六进制值 |
|---|---|---|
| blue | 0 0 255 | 0000ff |
| green | 0 255 0 | 00ff00 |
| black | 0 0 0 | 000000 |
| white | 255 255 255 | ffffff |
| red | 255 0 0 | ff0000 |
| yellow | 255 255 0 | ffff00 |
| grey | 128 128 128 | 808080 |
| lightblue | 0 255 255 | 00ffff |
| purple | 255 0 255 | ff00ff |
以下是一些用于为照片图像创建分割mask的自动和手动工具:
自动:
- MIT Scene Parsing
- SuperParsing
- Nonparametric Scene Parsing
- Berkeley Contour Detection and Image Segmentation Resources
- CRF-RNN for Semantic Image Segmentation
- Selective Search
- DeepLab-TensorFlow
手动:
- Photoshop Quick Selection Tool
- GIMP Selection Tool
- GIMP G'MIC Interactive Foreground Extraction tool
举例
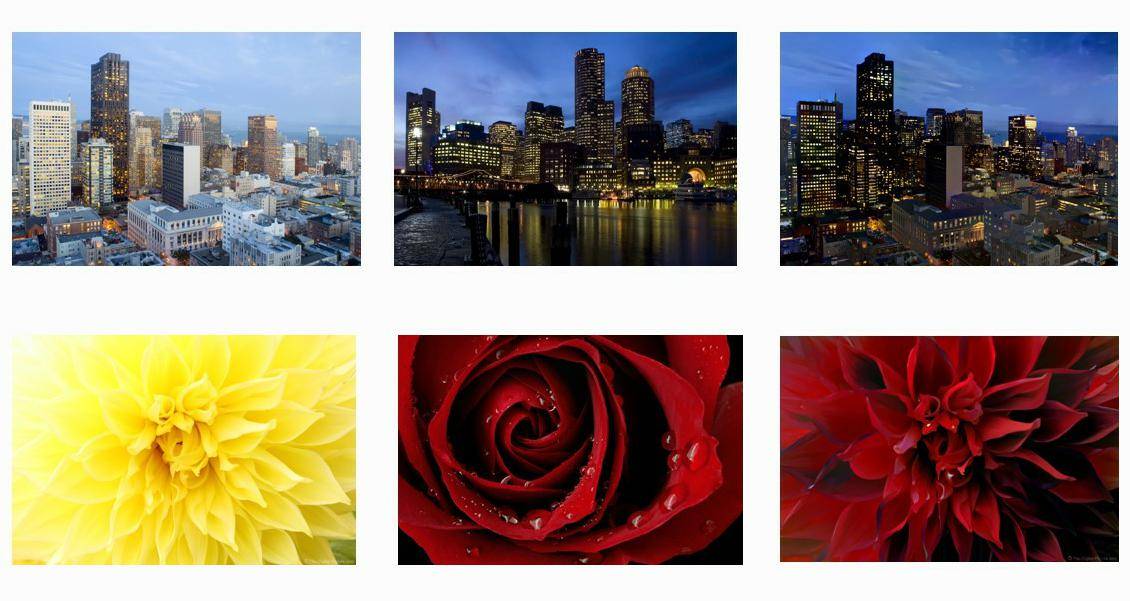
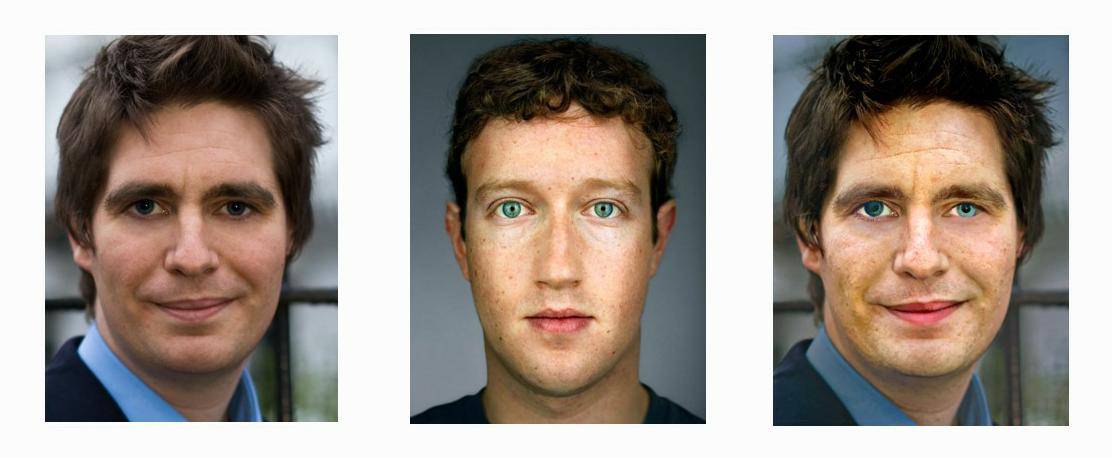
这是算法的一些结果(从左到右是输入,样式和我们的输出):
如果遇到文件不能下载或其他产品问题,请添加管理员微信:ligongku001,并备注:产品反馈

评论(0)

 理工酷
理工酷
 资源下载
资源下载
